* * * * *
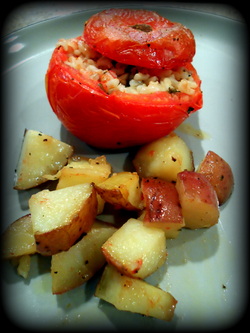
This recipe gets 5 stars from me! I couldn't believe the amount of flavor that came from this dish! I thought that they would possibly end up a little bland but much to my surprise they did not! I loved how this recipe had a different twist. I've had stuffed peppers but I've never had stuffed tomatoes! I actually think that I like these a little bit more than stuffed peppers too! I found this recipe on Pinterest and it from Kristina at the Design Sponge blog. If you're looking for a great recipe to mix things up I think this one is perfect! Plus, tomatoes are at their peak right now so it's the perfect time to put those tomatoes from the garden to good use!
What I Did Differently:
I actually didn't change a thing!
Overall Thoughts:
I will be making this recipe again! I absolutely love tomatoes and I think this recipe is fantastic! I couldn't stop eating them!
* * * * *
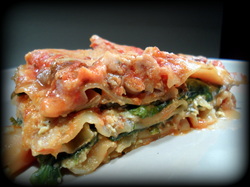
This recipe gets 5 MAJOR stars from both my husband and I. Not only is this recipe really easy to cook up, it also tastes amazingly delicious! I say "amazingly" because the ingredients are so simple but yet they create this mouthwatering, flavorful dish! I found this recipe on Pinterest from Christine at the Hippy Homemaker blog. Christine found this recipe on the Chloe's Kitchen blog but I couldn't locate the original recipe on the website. However, I'm VERY grateful to have found it on Christine's blog because this is by far one of my most favorite lasagnas! I was hesitant on cooking up a vegan lasagna because I was afraid that it wouldn't be the same as the non-vegan lasagnas but this recipe really blew my husband and me away. This recipe will definitely go on my favorites list!
What I Did Differently:
Overall Thoughts:
We are actually making this again because it was so great! The leftovers are perfect for lunch during the work week too! This will be my go to recipe for lasagna. My husband said that I shouldn't change a thing!

* * * * *
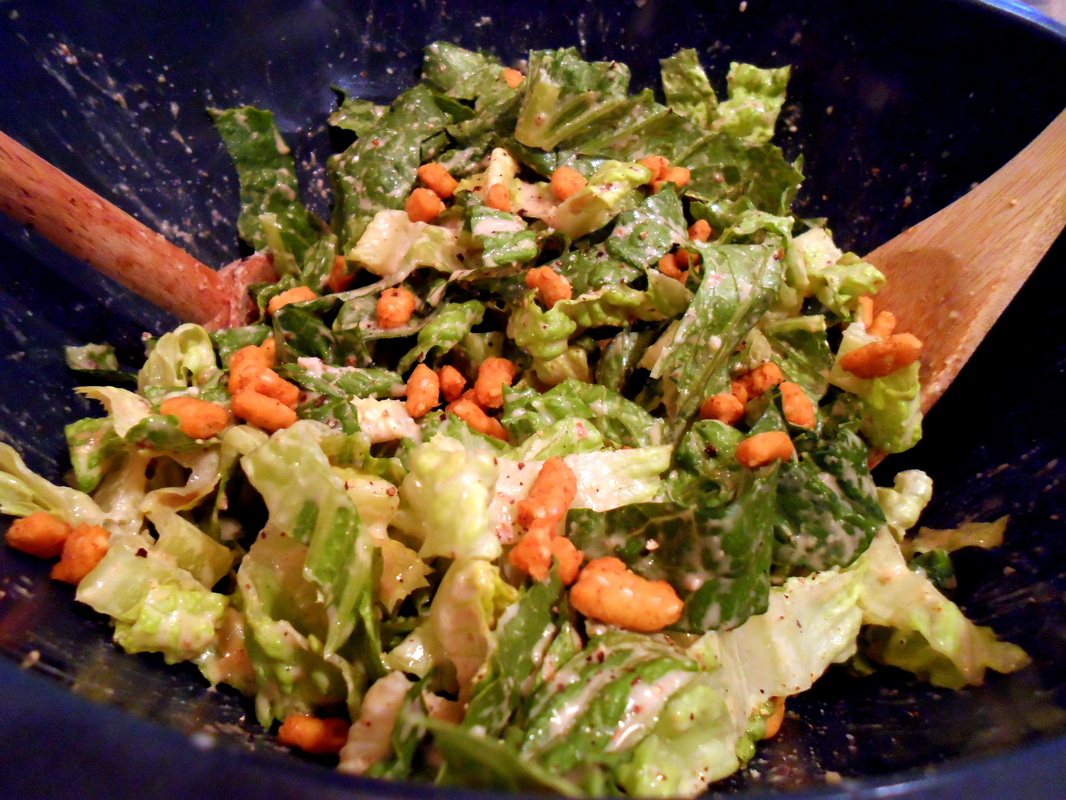
I won't lie...I've been missing a Caesar Salad ever since I went vegan. I used to make the BEST Caesar Salads from scratch but they always contained animal products like egg yolk, anchovy paste, non-vegan Worcestershire (contains anchovies), and parmesan cheese. I was baffled on how to recreate the dressing and make it taste the same until I came across this recipe on Pinterest! This recipe is from Steph at the Whole Food Lab blog. This recipe is a 5 star winner! I was so impressed with how it tasted almost exactly like the Caesar Salad dressing that I used to make! I did some add ins to make it more similar and I think it turned out perfectly! I served up a big plate of this with some leftover Fettuccini Alfredo. This salad was perfect! Usually I make homemade croutons but I've just been so busy this last week with an irregular working schedule so I opted to get some vegan sesame salad nuggets. I think next time I'll make my own croutons though! Either way, this salad really satisfied my cravings!
What I Did Differently:
I thought this recipe was missing 2 ingredients...nutritional yeast & pepper. I added in a heaping tablespoon of nutritional yeast to simulate the taste of parmesan cheese and to give a vitamin B-12 kick. I tossed the romaine lettuce with the dressing and then I added a lot of fresh cracked pepper on top and then tossed it in. It turned out perfect!
Overall Thoughts:
I thought this recipe was a really interesting combination of ingredients! I would have never thought of putting all these together for a Caesar Salad Dressing! What a genius Steph is! This will be my go to recipe for Caesar Salad from now on! Thank you Steph!
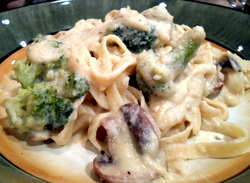
This sauce is so awesome! I never really cared for the real alfredo sauce because of the weird aftertaste. However, this sauce doesn't have that and it tastes absolutely amazing! I just love using cauliflower in creamy dishes because you would never be able to tell! I adapted this recipe for the sauce from Lindsay at the Pinch Of Yum blog. To make this recipe vegan I used unsweetened soy milk and Earth Balance butter in place of the regular milk and butter. I also added about 2 tablespoons of nutritional yeast to give it a bit of a parmesan flavor without being overpowering. I topped it off with some baby bella mushrooms and fresh steamed broccoli to make it even more delicious! So here's the veganized version of fettuccini alfredo!
Ingredients:
1 lb. fettuccini noodles, cooked
2 tbs. Earth Balance butter
8 cloves of garlic, finely minced
6 cups cauliflower florets (about 1 & 1/2 whole cauliflowers)
6-7 cups of veggie broth or water (I used veggie broth)
1/2 cup unsweetened soy milk
1 tbs. olive oil
1 tsp. salt
1/2 tsp. freshly grated pepper
2 tbs. nutritional yeast
8 oz. package of baby bella mushrooms, sliced
12 oz. package of frozen broccoli, steamed
How To:
Cook the fettuccini according the package instructions.
In a large pot bring the broth or water to a boil. Add the cauliflower and cover; cooking until tender (about 6-7 minutes). Do not drain.
While the cauliflower is cooking melt the butter over low heat in a small skillet and add the garlic. Cook until the garlic is softened making sure not to brown the garlic. Set aside.
Transfer the cauliflower with a slotted spoon to a large food processor. Add one cup of the remaining vegetable broth or water, the sautéed garlic & butter, salt, pepper, milk, nutritional yeast, and olive oil. Blend until smooth and add more milk or veggie broth/water until you have reached your desired consistency.
In a skillet over medium heat, sauté the mushrooms in some veggie broth. Cover for the first few minutes until mostly tender and then remove the cover to cook off the excess liquid.
Steam the broccoli according to package instructions.
Place the noodles in a large bowl and top with the sauce, mushrooms and steamed broccoli. Enjoy!
* * * * *
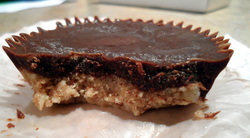
This recipe gets 5 stars! These didn't last very long at all because they were so good! These were the perfect little dessert and a great quick snack! I found this recipe on Pinterest and it's from Angela at the Oh She Glows blog. I knew right when I saw the picture of the almond butter cup that I just HAD to try it! Lately, I've really been getting into raw desserts and so far I've been loving every single one of them! I find them refreshing on hot summer days. Raw desserts also have that interesting appeal to them and I love that they're different than other desserts that I've already tried. Also, as an added benefit, they're usually much more healthier than a non-vegan dessert, packed with a lot of protein, they typically don't contain a lot of processed ingredients or any at all, and some of them are high in fiber (such as recipes that use dates). Anyways, if you're looking for a great raw dessert to try out this one is great!
What I Did Differently:
I didn't have the silicone muffin pan so I used a metal muffin pan with paper liners. I had some trouble with the chocolate sauce leaking down the sides of the nut mixture so I had to make a double batch of sauce. I think this happened because I wasn't able to really push down the nut mixture and create a seal proof edge without disturbing the paper liner too much. This still turned out great though! I would just use a silicone muffin pan or make a double batch of chocolate sauce!
Overall Thoughts:
I really love this recipe and I will be making these again! I think it would be interesting to change up what nut butters to use. Next time I want to try a natural peanut butter. I don't think it will be very long before my Hubby asks me to make these again!
* * * * *
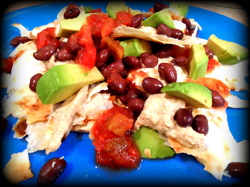
I give this recipe 5 stars! It's such a simple recipe to make and it tastes absolutely delicious! I found this recipe on Pinterest and it's from Ashley at the Edible Perspective blog. Besides the time that it takes to soak the cashews, this meal can be made up in about 10-15 minutes (if you already have tortillas or tortilla chips on hand)! I really love the cashew cream because it complimented the other flavors in the dish. I like that the cream didn't have any nutritional yeast in it because I find that when recipes use nutritional yeast as the main "cheese" flavoring that it's overpowering. I love to sprinkle a bit of nutritional yeast on top of dishes as an alternative to parmesan cheese but as far as making it the main flavor for a "cheese" replacement...no way! I've tried several vegan macaroni & cheese dishes that used varying amounts of nutritional yeast as the main "cheese" flavoring ingredient and I personally found it disgusting. This recipe however, is right up my alley and it tastes fantastic! My husband and I made this our meal for dinner last night & it was perfect!
What I Did Differently:
I didn't make the corn tortillas because I had some really nice organic white flour tortillas on hand. So, I just toasted up the tortillas in a pan, without any oil, until crispy and then broke it up into pieces. It worked perfectly! I also added a bit more salt and cumin to the cashew mixture because I used a little more water.
Overall Thoughts:
I will definitely make this again! Next time, I would love to make my own corn tortillas because I think it would make this dish even more spectacular!

* * * * *
My only regret is not trying this recipe sooner because both my husband and I agree that these cookies ARE the best oatmeal raisin cookies that we've had! My husband took one bite and said, "These taste too good to be vegan!" This recipe gets 5 huge stars! I found this recipe on Twitter and it's from the Vegan Lyfe blog. These cookies were easy to make and it used basic ingredients. They were perfectly soft, slightly chewy, and crispy around the edges...that's my idea of the perfect cookie! These cookies are a MUST make if you love oatmeal raisin cookies!
What I Did Differently:
The recipe called for 18 cookies but I made my cookies a little bit smaller and made 24. I baked the cookies for 10 minutes and they came out perfect!
Overall Thoughts:
I will be making these cookies again! I don't think I'll have a choice because I have a feeling that my husband will be asking me for these often! These cookies go on my favorite list!
* * * * *
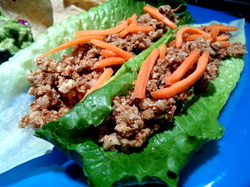
Oh. My. Goodness. These tacos were awesome and they really hit the spot! I rate this recipe with 5 huge stars! I couldn't put these tacos down! I found this recipe on Pinterest and it's from Christy at The Blissful Chef blog. My Husband really enjoyed these tacos as well! He seemed a bit skeptical when I pulled out the romaine lettuce leaves to use for the taco shells but as soon as he took a bite all of the skepticism disappeared! These tacos literally took only 10 minutes to make besides the time used to soak the nuts! They satisfied my craving and went above and beyond my expectations. I only used shredded carrots and salsa to top off my tacos and I served it with a side of my homemade guacamole.
What I Did Differently:
I didn't change one thing about this recipe!
Overall Thoughts:
This recipe will definitely be one of my "go to" taco recipes! I will be making these again...probably very soon! I can't wait to try more recipes from Christy! She is brilliant!
* * * * *
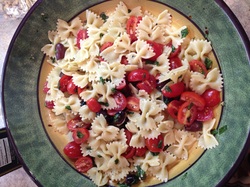
Wow! This dish was just absolutely amazing! I found this recipe on Pinterest and it's from MyRecipes.com. I was really surprised with the amount of flavor in this dish and both my Husband and I polished it off! This dish was so easy to make and it was great for the hot summer night that we were having! All of the flavors in this dish were complimentary and a perfect combination! This dish is bound to ''Wow" you!
What I Did Differently:
I used kalamata olives because I couldn't find the kind listed in the recipe.
I let all of the ingredients EXCEPT for the pasta marinate for awhile. My husband and I were doing some yard work and I figured that if I prepared everything but the pasta and let it marinate while we worked in the yard for about an hour that it wouldn't hurt! It turned out AMAZING!
Overall Thoughts:
This is a recipe that I will HAVE to make again. Actually, my husband asked if I could make it again tonight! So, that's how good it is! If you have the time I would let the ingredients marinate at room temperature for at least a half hour.
* * * * *
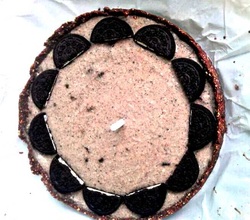
Oh my, oh my, what an awesome pie! This gets 5 big stars! I found this recipe on the Chocolate Covered Katie Blog. I made this pie for my husband's birthday yesterday (please don't mind the birthday candle in the picture) and it was a huge hit that it even fooled my non-vegan parents! This pie is just plain good and the real catch is that it's actually a healthy dessert! Katie is my new savior for helping me to cure my sweet tooth but staying on track to eating healthy! Thank goodness for people like her! If you haven't heard of her blog then I advice you that you must check it out and give her recipes a try if you love your sweets but don't want extra weight in your caboose! Anyways, the filling of this pie is made out of a surprising ingredient...cashews! The freaky thing is that you can't even tell! She does list other nut options in her recipe but seeing as how I had raw cashews on hand I just used what I had. If you're looking for a crowd pleasing pie that's bound to fool even non-vegans and cure your sweet tooth then this is the pie for you!
What I did Differently:
I just embellished the top of the pie with Oreo cookie halves to jazz it up a bit.
Katie offers different options to sweeten the pie with and I chose maple syrup.
Overall Thoughts:
I will be making this pie again! It was so easy and simple to make and it used regular ingredients that I typically have in my pantry! Everyone LOVED this pie! It was a great birthday treat for my husband!
 RSS Feed