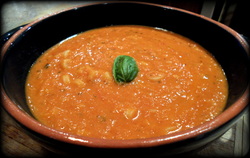
 I love a good tomato soup! Heck, I love soups! I love taking them for lunch because it's so quick and easy to throw into a container and go out the door! Tomato soup has a special place in my heart though! It brings back some great childhood memories! This tomato soup is loaded with vitamins, nutrients, and antioxidants, and it's packed full of flavor! The pasta in this soup helps not only to thicken it but also to fill you up! I must warn you, this soup is addicting! I adapted this recipe to be vegan. The original recipe is from Cooking Light and I was making it for years! After I went vegan, I noticed that this recipe can easily be adapted! I hope you enjoy it as much as I do!
Ingredients: 2 tbs. Earth Balance Butter (you can use the sticks or the spread)
1 cup chopped onion
1 cup chopped carrot
1/3 cup chopped celery
1 & 1/2 cups veggie broth
1 tsp. dried basil or 2 tsp. fresh basil
1/4 tsp. black pepper
28-ounce can of diced tomatoes (Do Not Drain)
1 cup uncooked small pasta (you can use stars, alphabets or mini rings)
1 cup unsweetened plain soy milk How To: Cook the pasta according to package instructions. While you are preparing the noodles you can start your prep for your veggies.
In a saucepan, melt the butter over medium-high heat. Add the onion, carrot, and celery and sauté until tender. Add the broth, basil, pepper, and tomatoes. Bring to a boil then reduce the heat and simmer for 15 minutes. Stir in 1/2 cup of the cooked pasta and remove from heat.
In a food processor or blender add half of the mixture and blend until smooth. Place in a large bowl and repeat the process for the other half. Add the mixture back to the saucepan and stir in the soy milk and the remaining pasta. Cook on medium-high heat until heated all the way through (about 2 minutes).
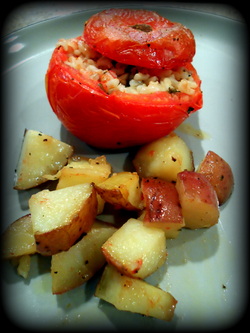 * * * * *
This recipe gets 5 stars from me! I couldn't believe the amount of flavor that came from this dish! I thought that they would possibly end up a little bland but much to my surprise they did not! I loved how this recipe had a different twist. I've had stuffed peppers but I've never had stuffed tomatoes! I actually think that I like these a little bit more than stuffed peppers too! I found this recipe on Pinterest and it from Kristina at the Design Sponge blog. If you're looking for a great recipe to mix things up I think this one is perfect! Plus, tomatoes are at their peak right now so it's the perfect time to put those tomatoes from the garden to good use!
What I Did Differently: I actually didn't change a thing! Overall Thoughts: I will be making this recipe again! I absolutely love tomatoes and I think this recipe is fantastic! I couldn't stop eating them!
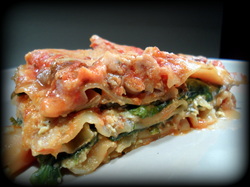 * * * * *
This recipe gets 5 MAJOR stars from both my husband and I. Not only is this recipe really easy to cook up, it also tastes amazingly delicious! I say "amazingly" because the ingredients are so simple but yet they create this mouthwatering, flavorful dish! I found this recipe on Pinterest from Christine at the Hippy Homemaker blog. Christine found this recipe on the Chloe's Kitchen blog but I couldn't locate the original recipe on the website. However, I'm VERY grateful to have found it on Christine's blog because this is by far one of my most favorite lasagnas! I was hesitant on cooking up a vegan lasagna because I was afraid that it wouldn't be the same as the non-vegan lasagnas but this recipe really blew my husband and me away. This recipe will definitely go on my favorites list!
What I Did Differently: Overall Thoughts: We are actually making this again because it was so great! The leftovers are perfect for lunch during the work week too! This will be my go to recipe for lasagna. My husband said that I shouldn't change a thing!
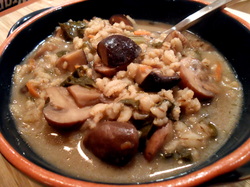 This soup is one of my all-time favorites! It's savory, creamy, filling, it's easy to make, and it's packed full of vitamins and nutrients. I love a good hearty soup on cooler weather days and lately it's been feeling more like fall in Wisconsin. I always make up a huge pot of this because it's so darn delicious! My husband and I usually make one dinner out it and then we take the leftovers for lunch for the rest of the week. This soup is so hearty that it can stand as a meal all on its own! This soup also freezes well!
Ingredients: 1 oz. dried shiitake mushrooms, soaked in 1 cup hot water
3 tbs. sesame oil
24 oz. of baby bella mushrooms, sliced
1 medium onion, diced
2 carrots, chopped
2 stalks of celery, chopped
1 garlic clove, minced
8 cups mushroom broth
2 cups unsweetened soy milk
2 cups water
11 oz. package quick barley
3-4 cups fresh kale, stems removed and roughly chopped
6 tablespoons Bragg Liquid Aminos
1 tbs. minced fresh thyme
1 tbs. dried dill
1 tsp. pepper How To: Place the dried shiitake mushrooms in a bowl and pour one cup of boiling water over the mushrooms and submerge them completely (I used a glass 2 cup measuring cup and placed a small bowl on top of the mushrooms to submerge them). Set aside and let soak for at least 10 minutes.
In a large stock pot over medium heat, add the sesame oil, baby bella mushrooms, onion, carrots, and celery. Cover and cook until the mushrooms & onions are tender.
Meanwhile, remove the shiitake mushrooms and reserve the water. Slice the shiitake mushrooms and add them to the pot of veggies along with the garlic and sauté for two minutes.
Add the reserved water from the shiitake mushrooms along with the rest of the ingredients. Cover, reduce heat to medium low, and allow to simmer for about 30 minutes or until the barley puffs up and is tender. The barley will puff up before 30 minutes but I like to let the soup cook a little longer to allow the flavors to develop more.
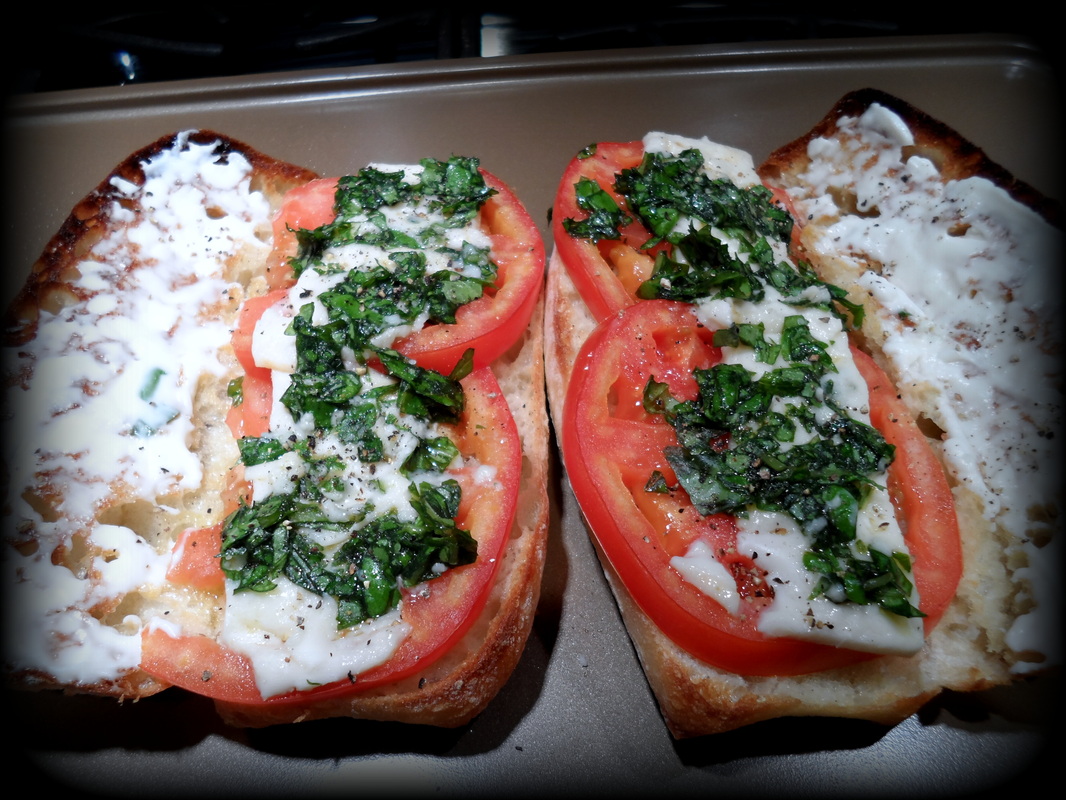
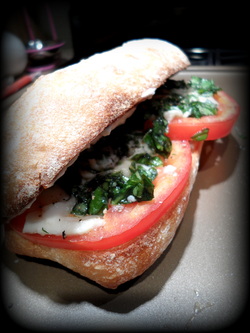 So Sunday afternoon my husband and I got back from grocery shopping and we were a bit hungry. I wanted to make something quick and I had a huge juicy tomato calling my name! So, I decided to make a sandwich but I wanted to make something that was a bit more fancy...something that you would expect at a little café or casual restaurant. My husband has always liked the Tomato & Mozzarella Panini from Starbuck's. I wanted to do something similar to this but with a bit of a twist and make it vegan, of course! So, I set out to make one heck of a Tomato Basil Café Sandwich! I think this was a huge success because my husband was saying the other night that he wanted me to make more of these sandwiches! This recipe makes 2.
Ingredients: 2 Vegan French Baquette rolls (I found mine at the local grocery store, Pick N' Save)
Olive oil
4 large tomato slices
1/3 chopped basil
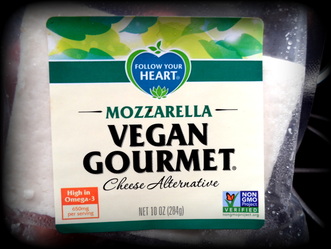
4 slices of Follow Your Heart Vegan Gourmet Mozzarella
2 tbs. Veganaise
Salt & pepper to taste How To: Turn on the broiler. Slice the rolls in half length-wise without cutting all the way through the other end (like a hot dog bun). Place the rolls on a cookie sheet. Brush the inside of the rolls with olive oil or use an olive oil pump sprayer to coat (I used the sprayer so I'm not sure how much you would use if you brush the inside but the goal is to get a light coating of oil). Place 2 tomato slices on the bottom half of each bun & place a slice of mozzarella on each tomato slice.
In a small bowl combine the basil with enough olive oil to make a sauce (about 2 tbs.). Evenly divide the sauce and drizzle on top of the tomatoes & mozzarella. Season with salt & pepper to taste.
Place under the broiler and cook until cheese is bubbly and melted (about 5 minutes). Remove from the oven. Now that the cheese is soft you can spread it a bit more on
the tomatoes if you like ! Spread the top half of each bun with a tablespoon of veganaise. Enjoy!
 * * * * *
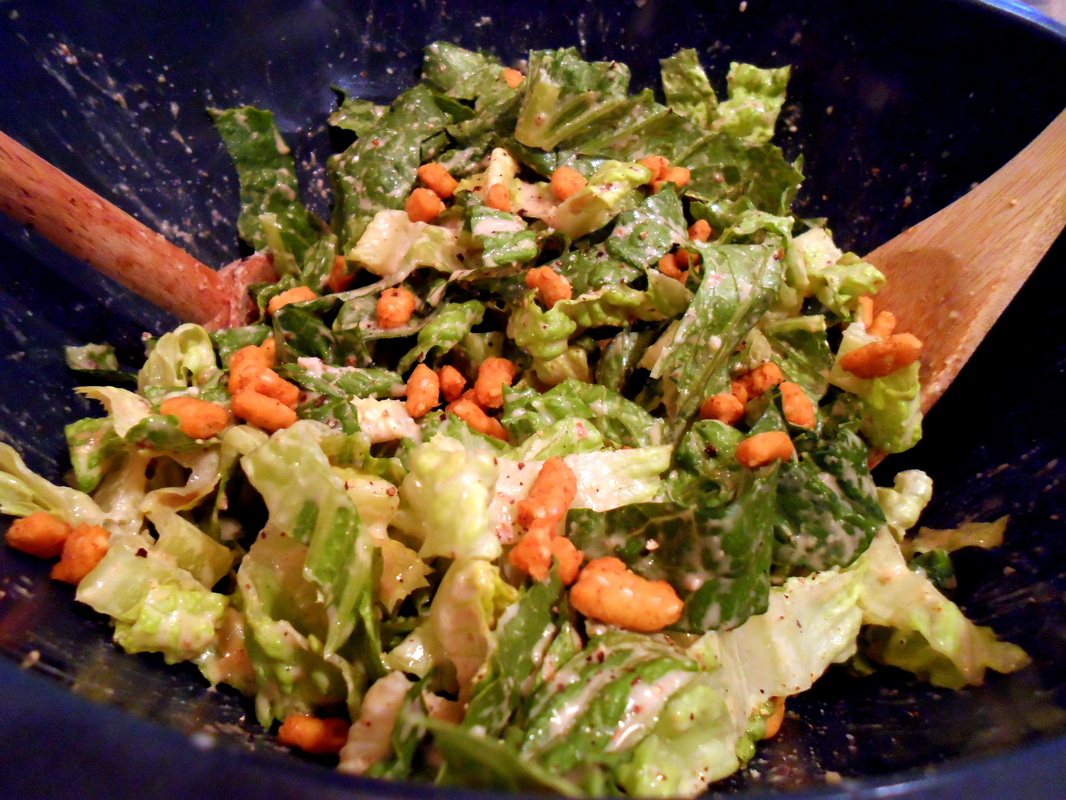
I won't lie...I've been missing a Caesar Salad ever since I went vegan. I used to make the BEST Caesar Salads from scratch but they always contained animal products like egg yolk, anchovy paste, non-vegan Worcestershire (contains anchovies), and parmesan cheese. I was baffled on how to recreate the dressing and make it taste the same until I came across this recipe on Pinterest! This recipe is from Steph at the Whole Food Lab blog. This recipe is a 5 star winner! I was so impressed with how it tasted almost exactly like the Caesar Salad dressing that I used to make! I did some add ins to make it more similar and I think it turned out perfectly! I served up a big plate of this with some leftover Fettuccini Alfredo. This salad was perfect! Usually I make homemade croutons but I've just been so busy this last week with an irregular working schedule so I opted to get some vegan sesame salad nuggets. I think next time I'll make my own croutons though! Either way, this salad really satisfied my cravings!
What I Did Differently: I thought this recipe was missing 2 ingredients...nutritional yeast & pepper. I added in a heaping tablespoon of nutritional yeast to simulate the taste of parmesan cheese and to give a vitamin B-12 kick. I tossed the romaine lettuce with the dressing and then I added a lot of fresh cracked pepper on top and then tossed it in. It turned out perfect! Overall Thoughts: I thought this recipe was a really interesting combination of ingredients! I would have never thought of putting all these together for a Caesar Salad Dressing! What a genius Steph is! This will be my go to recipe for Caesar Salad from now on! Thank you Steph!
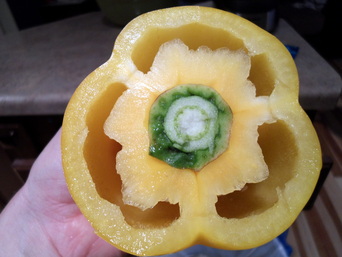
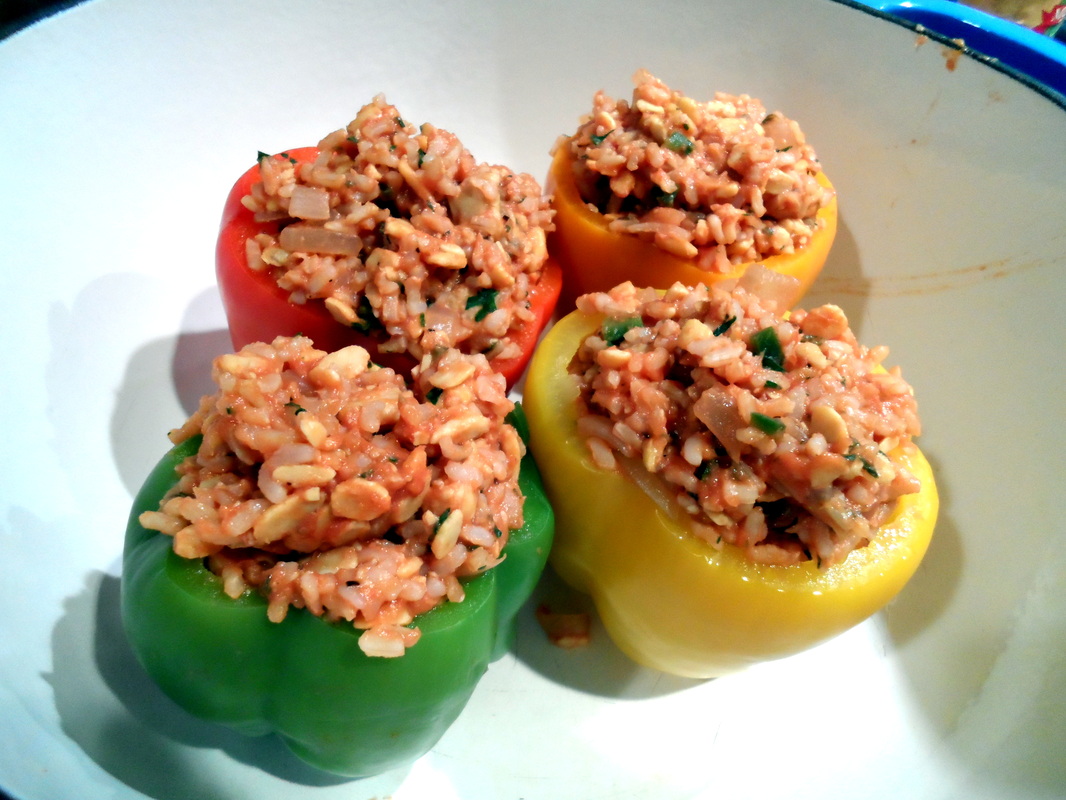
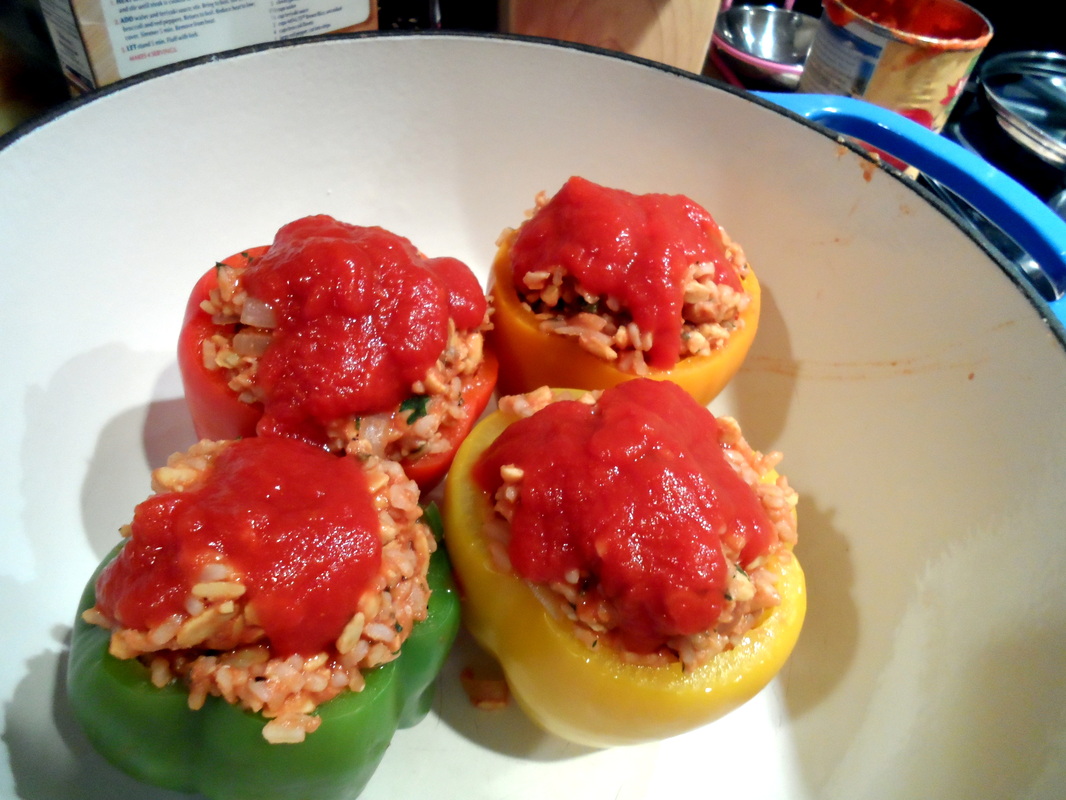
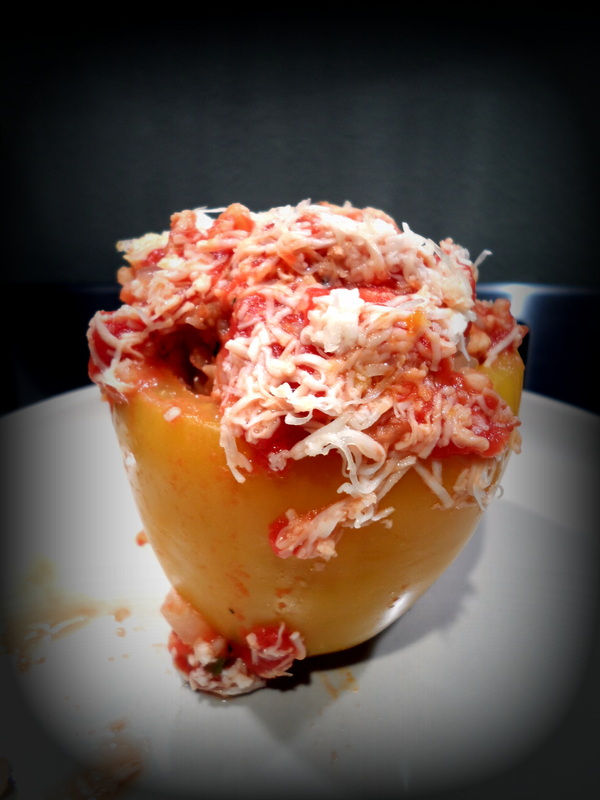
 It had been a little cold over this last weekend and it was tricking me into thinking that Fall was just around the corner. I really started to crave some comfort food but I wanted to stick with something that was simple, vegan, healthy, and contained a good amount of vegetables. Suddenly, I started thinking into my childhood of some great comfort dishes that my Mom used to make. I started to ponder on stuffed peppers and I quickly thought of a great and easy idea to make them vegan and to replace the meat with whole ingredients; skipping the fake meats. The answer...tempeh! I've discovered a new love for tempeh and it works very well in this dish! My husband, the omnivore, was really impressed with this dish. This dish will easily satisfy the non-vegans! I hope you enjoy it as much as we did! The recipe below serves 4.
Ingredients: 4 bell peppers (any color but I think red & green are best)
1 & 1/2 cups uncooked instant whole grain brown rice (you can use regular brown rice but I did instant to get it done faster)
8 oz. package of tempeh
1/2 of a small sweet onion, chopped
1 garlic clove, minced
1 jalapeno, minced
Veggie broth for sautéing (about 1/4 cup give or take) or you can use 1 tbs. oil
15 oz. can organic tomato sauce (I used Muir Glen)
1/2 tsp. freshly ground pepper
1 tbs. fresh parsley, minced
1 tsp. fresh thyme, minced
Follow your Heart Vegan Gourmet mozzarella cheese (the block kind)
How To: Preheat the oven to 400 degrees. Cook rice according to the ratios and instructions per package. My box of instant rice was a ratio of 1 cup rice per 1 cup water for 2 servings so I used 1 & 1/2 cups rice and 1 & 1/2 cups water and it turned out perfect. I just followed the cooking instructions on the box. I used the Minute rice brand. When done cooking, set aside.
In a large pot, fill with enough water to cover the peppers and bring it to a boil. Cut the tops off of the peppers trying not to waste a lot. This is how I like to cut mine. I like to cut just the top off and then I take the knife and separate and take out what is left in the middle. I then slice a little off of the bottom to make it sit evenely.
When the water comes to boil, add the peppers and cover to cook for 2 minutes. Drain the peppers and rinse with cold water. Set aside.
In a large skillet, crumble in the tempeh, add the onions
& garlic, and add enough veggie broth to sauté. Cook over medium heat until the onions are tender. Add the jalapeno and cook until tender (about 3-5 minutes). Be sure to add more veggie broth if the mixture begins to become really dry. Reserve 1/4 cup of the tomato sauce. Add the remaining sauce, brown rice, black pepper, parsley & thyme, and cook until heated through.
Stuff the peppers generously with the mixture. Place in a baking dish or a dutch oven. Top with remaining tomato sauce and grate the cheese on top. Bake covered for 30 minutes. If using a baking dish, you can cover it with aluminum foil. Enjoy!
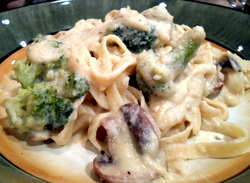 This sauce is so awesome! I never really cared for the real alfredo sauce because of the weird aftertaste. However, this sauce doesn't have that and it tastes absolutely amazing! I just love using cauliflower in creamy dishes because you would never be able to tell! I adapted this recipe for the sauce from Lindsay at the Pinch Of Yum blog. To make this recipe vegan I used unsweetened soy milk and Earth Balance butter in place of the regular milk and butter. I also added about 2 tablespoons of nutritional yeast to give it a bit of a parmesan flavor without being overpowering. I topped it off with some baby bella mushrooms and fresh steamed broccoli to make it even more delicious! So here's the veganized version of fettuccini alfredo!
Ingredients: 1 lb. fettuccini noodles, cooked
2 tbs. Earth Balance butter
8 cloves of garlic, finely minced
6 cups cauliflower florets (about 1 & 1/2 whole cauliflowers)
6-7 cups of veggie broth or water (I used veggie broth)
1/2 cup unsweetened soy milk
1 tbs. olive oil
1 tsp. salt
1/2 tsp. freshly grated pepper
2 tbs. nutritional yeast
8 oz. package of baby bella mushrooms, sliced
12 oz. package of frozen broccoli, steamed How To: Cook the fettuccini according the package instructions.
In a large pot bring the broth or water to a boil. Add the cauliflower and cover; cooking until tender (about 6-7 minutes). Do not drain.
While the cauliflower is cooking melt the butter over low heat in a small skillet and add the garlic. Cook until the garlic is softened making sure not to brown the garlic. Set aside.
Transfer the cauliflower with a slotted spoon to a large food processor. Add one cup of the remaining vegetable broth or water, the sautéed garlic & butter, salt, pepper, milk, nutritional yeast, and olive oil. Blend until smooth and add more milk or veggie broth/water until you have reached your desired consistency.
In a skillet over medium heat, sauté the mushrooms in some veggie broth. Cover for the first few minutes until mostly tender and then remove the cover to cook off the excess liquid.
Steam the broccoli according to package instructions.
Place the noodles in a large bowl and top with the sauce, mushrooms and steamed broccoli. Enjoy!
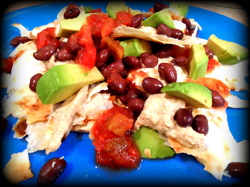 * * * * *
I give this recipe 5 stars! It's such a simple recipe to make and it tastes absolutely delicious! I found this recipe on Pinterest and it's from Ashley at the Edible Perspective blog. Besides the time that it takes to soak the cashews, this meal can be made up in about 10-15 minutes (if you already have tortillas or tortilla chips on hand)! I really love the cashew cream because it complimented the other flavors in the dish. I like that the cream didn't have any nutritional yeast in it because I find that when recipes use nutritional yeast as the main "cheese" flavoring that it's overpowering. I love to sprinkle a bit of nutritional yeast on top of dishes as an alternative to parmesan cheese but as far as making it the main flavor for a "cheese" replacement...no way! I've tried several vegan macaroni & cheese dishes that used varying amounts of nutritional yeast as the main "cheese" flavoring ingredient and I personally found it disgusting. This recipe however, is right up my alley and it tastes fantastic! My husband and I made this our meal for dinner last night & it was perfect!
What I Did Differently: I didn't make the corn tortillas because I had some really nice organic white flour tortillas on hand. So, I just toasted up the tortillas in a pan, without any oil, until crispy and then broke it up into pieces. It worked perfectly! I also added a bit more salt and cumin to the cashew mixture because I used a little more water. Overall Thoughts: I will definitely make this again! Next time, I would love to make my own corn tortillas because I think it would make this dish even more spectacular!
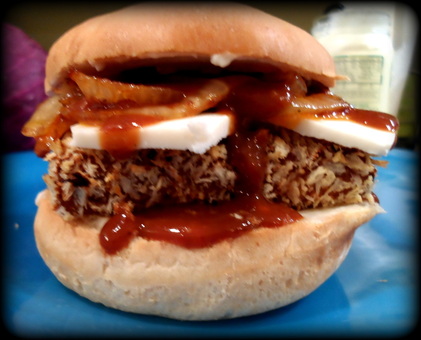
 This sandwich is pure awesomeness! I wanted to cook something up that uses pretty basic ingredients and doesn't take extensive hours in the kitchen but creates a "knock your socks off, restaurant quality at home" type of sandwich. I think I did a pretty darn good job! The crispy coating on this tofu is incredible! This recipe only uses 8 simple ingredients and I was really impressed by the flavor of this sandwich! It definitely has that "WOW" factor! I was inspired to make this after trying the "Tofu Steak" sandwich at Outpost Foods a couple of weeks ago. Their tofu sandwich is breaded and topped with some caramelized onions on a ciabatta bread that is spread with some vegan mayo. Their sandwich inspired me to explore more tofu sandwich options.
Lately, I've been craving barbecue! I didn't want to just slather some barbecue sauce on the tofu and grill or bake it and call it a sandwich! Nope, I wanted something more spectacular, something that would stand out from the ordinary. After searching the internet for quite some time and not finding the exact type of sandwich that I was looking for, I decided to make one up myself! So here's the recipe for this beauty!
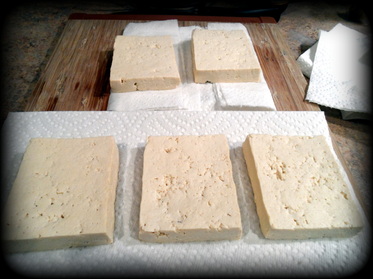
Ingredients: 1 block firm tofu, sliced into 1/2'' thick slices width-wise ( I got 5 slices)
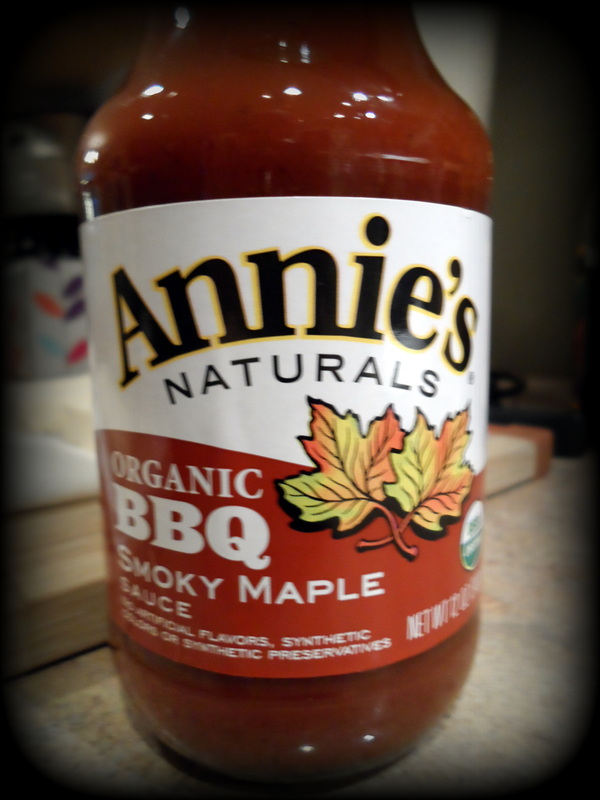
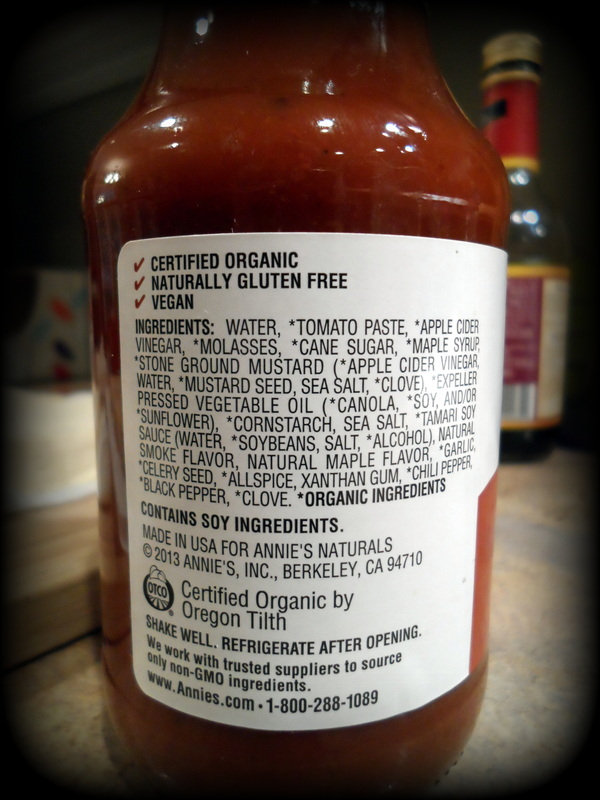
About 1 cup of vegan barbecue sauce (such as Annie's organic Smoky Maple), you may need extra for topping
1 cup panko bread crumbs
1/2 of a large white onion, sliced
1 tsp. coconut oil
Follow Your Heart mozzarella block cheese, cut into thin slices (I used 2 slices per sandwich)
Vegan buns
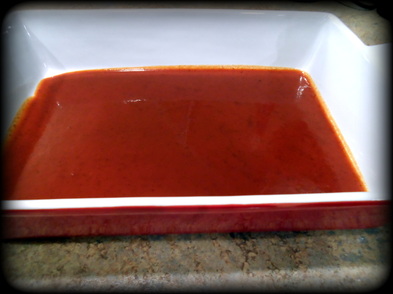
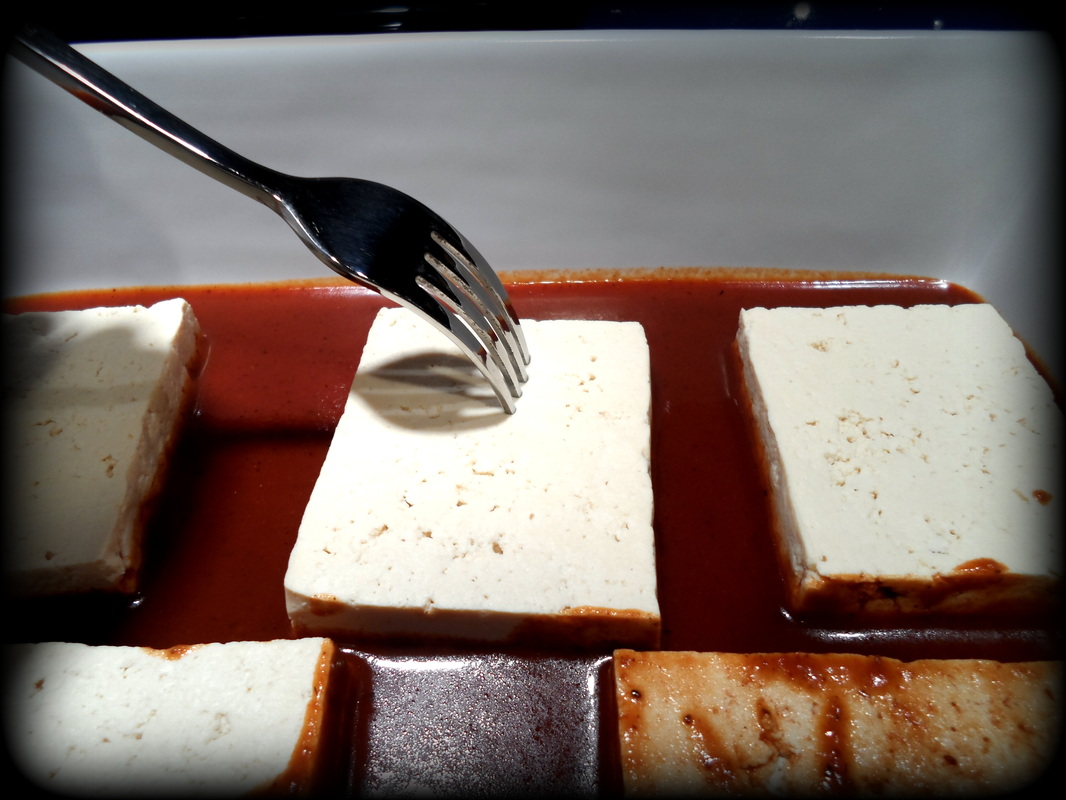
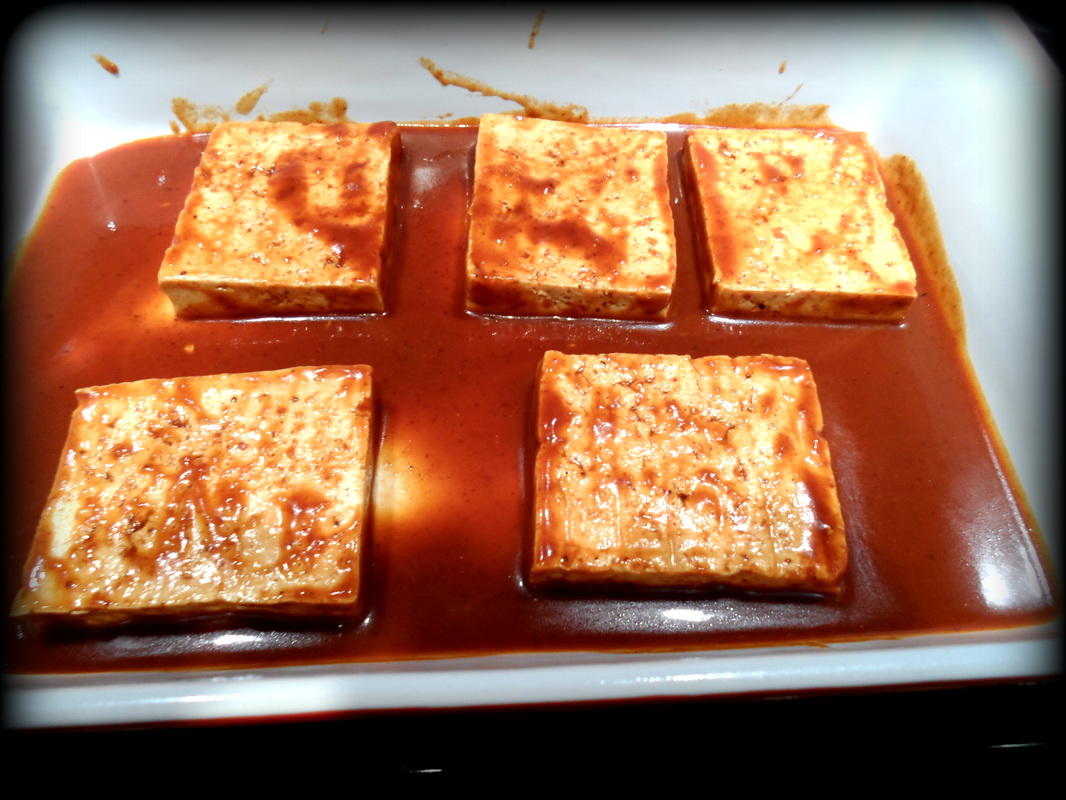
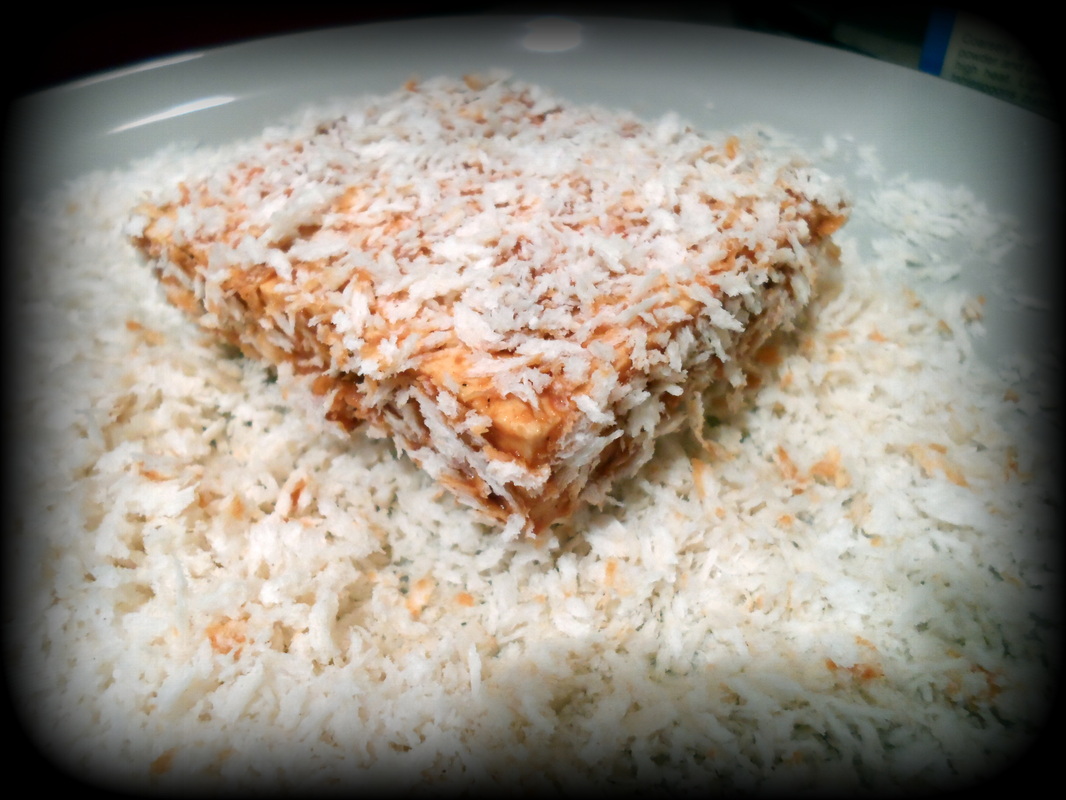
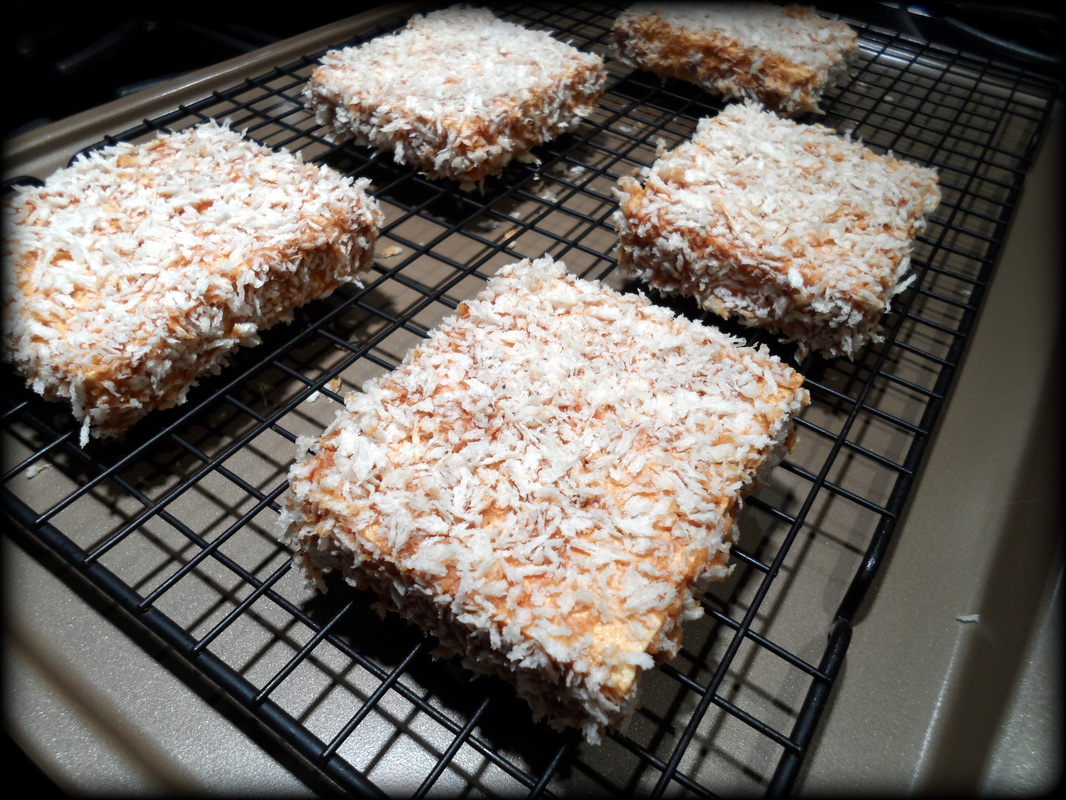
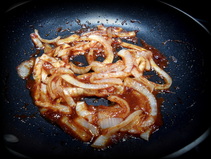
Veganaise How To: Slice the tofu and place on paper towels and/or tea towels, cover with more towels and firmly but gently press most of the moisture out. I used paper towels and went through three rounds of pressing with the towels (our tea towels were in the wash). In a shallow dish, such as a 13'' X 9'' pan, place one cup of barbecue sauce and tilt the pan to cover the entire bottom. This is the barbecue sauce that I used. I absolutely loved it! It was slightly sweet and had a nice smoky flavor that wasn't overpowering. Not ALL jarred barbecue sauces are vegan but I found this gem! I was going to make my own sauce but this saved me from buying 4 extra ingredients. Feel free to make your own! Place the tofu patties in the dish and place in the fridge to marinate for about 15 minutes. After 15 minutes, remove from the fridge and pierce the tofu patties (about 8 times per each patty) with a fork. Flip the patties over (move the barbecue sauce around, if necessary, with the fork to ensure even marination), and pierce the patties with the fork again. Move the patties around to coat the edges with the sauce too! Place the patties back in the fridge and allow to marinate for about 15 more minutes and preheat the oven to 400 degrees. Once the patties are done marinating, remove from the fridge and place the panko crumbs on a dinner plate. Place one patty at a time in the panko crumbs and coat all sides. I did this by placing the patty in the panko crumbs and then gently pressing the crumbs around the edges. I then flipped the patty over and covered it with a mound of panko crumbs from the plate and pressed the crumbs firmly into the patty. Gently remove any excess and place a wire cooling rack that's on top of a cookie sheet like pictured below. A regular cooling rack should do just fine! Using a rubber or silicone spatula, scrape the leftover barbecue sauce in a small dish because we will NOT be wasting any of this goodness! Set the sauce aside for the time being. Bake the patties on the middle rack for 35 minutes or until the panko is golden brown. While the patties are cooking prepare the onions. Place the coconut oil and onions in a pan over low/medium heat and cover. Once the coconut oil has melted, turn the heat to the lowest setting and allow to cook covered until the patties are almost done baking. When there is about 5 minutes left for the patties to cook, add 2-3 spoonfuls of the barbecue sauce to the onions. Turn the heat up to medium/low and cook uncovered to allow the sauce to thicken a bit (about 5 minutes). While the onions are cooking you can toast the buns if you like. I placed my buns in the toaster and turned on the bagel setting to toast just the inside but you can place them on the oven rack or on a griddle if you like. Turn off the heat for the onions when the patties are done and remove the patties from the oven. I used Rudi's hamburger buns because they're my favorite vegan buns! These can be found at Trader Joe's, Health Hut, and Outpost! I usually get the wheat (which are so good and NOT dry) but it was the first time that I saw the white buns so I grabbed them to give 'em a try! These buns are nice and dense and do not fall apart easily or stick to the roof of your mouth!
To assemble the sandwiches, smear the bottom half of the bun with a little bit of veganaise, drizzle with a little bit of the remaining barbecue sauce, place the tofu patty on the bun, add two thin slices of the mozzarella cheese (I crisscrossed mine), top with the onion mixture, drizzle with a little more of the barbecue sauce, spread the top half of the bun with a little bit of veganaise, and place the top of bun on the sandwich. Now take a look at that masterpiece, admire it for a second, and take a bite already because I know you're drooling! JUST AN FYI...I'm not really big on vegan cheeses but the mozzarella cheese that I picked up was awesome! It didn't have that tangy overloaded with nutritional yeast, type of flavor. I think this vegan mozzarella really does taste like the actual mozzarella cheese! I was really impressed! I especially loved the soft texture of the cheese too! My husband and I literally inhaled these sandwiches! I served these sandwiches with a basic coleslaw on the side and it was the perfect combination! You could easily adjust the recipe to make just two sandwiches (saving the remaining tofu for a different recipe) and then just half the rest of the ingredients! However, I prefer having leftovers and you can easily crisp these patties up again by heating them in a pan!
I hope you enjoy these just as much as we did!
|


 RSS Feed