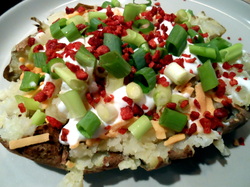
 Who doesn't love a loaded baked potato? I was skeptical as to how this would turn out because I was fearful that a vegan baked potato wouldn't be quite the same as the traditional kind from my childhood. I remember as a young child, waiting in long lines for countless years at the Wisconsin State Fair for a loaded baked potato! They were my favorite as a child but of course they were topped off with real butter, sour cream, cheese, and bacon. Sadly, I didn't know any better back then. However, I have the rest of my life to make up for it!
This vegan baked potato is just as good and is bound to leave your craving satisfied! I usually make these for dinner when it's been a long night and we don't have much time. Whenever I have physical therapy I don't get home until 7:15 pm and my husband and I don't have time to eat beforehand. So, I serve up this loaded baked potato alongside a large portion of steamed broccoli! This is a perfect meal for a dinner in a hurry! You could even use smaller baked potatoes and make this a side dish! This recipe serves two.
Ingredients: 2 baking potatoes
Earth Balance Vegan Buttery Spread
vegan shredded cheese (I like the Follow Your Heart Vegan Gourmet Shreds in cheddar)
vegan sour cream (I usually use the Tofutti brand)
vegan bacon bits
2 green onions
freshly ground pepper How To: Scrub the baking potatoes under cold water until clean. Pierce the potatoes with a fork on all sides. Place both of the potatoes on one microwave safe plate. Cooking times will vary per size of the potato. I usually use the potato setting on my microwave. I place them in the microwave and hit the potato button. When it's done I flip the potatoes, and hit the potato button one last time. If you don't have a potato setting, I would start with about 5 minutes and turn the potatoes halfway through. Cook the potatoes until tender when pierced with a fork all the way through.
When potatoes are done, place the potatoes on separate plates. Slice the potatoes lengthwise making sure to not cut all the way through and only halfway down the sides. Make several cuts the opposite way just on the top of the potato and then gently break apart the top of the potato with a fork working down to the bottom and sides of the potato to loosen everything up.
Top off with your desired amount of Earth Balance butter and sprinkle with the vegan cheese. I like to microwave my potato for an additional 45 seconds at this point. Top it off with your vegan sour cream and slice one green onion with a kitchen scissors over the top of each potato. Sprinkle with bacon bits and add some freshly ground pepper if you'd like! Serve with a side of steamed broccoli and you've got yourself a meal in less than 10 minutes!
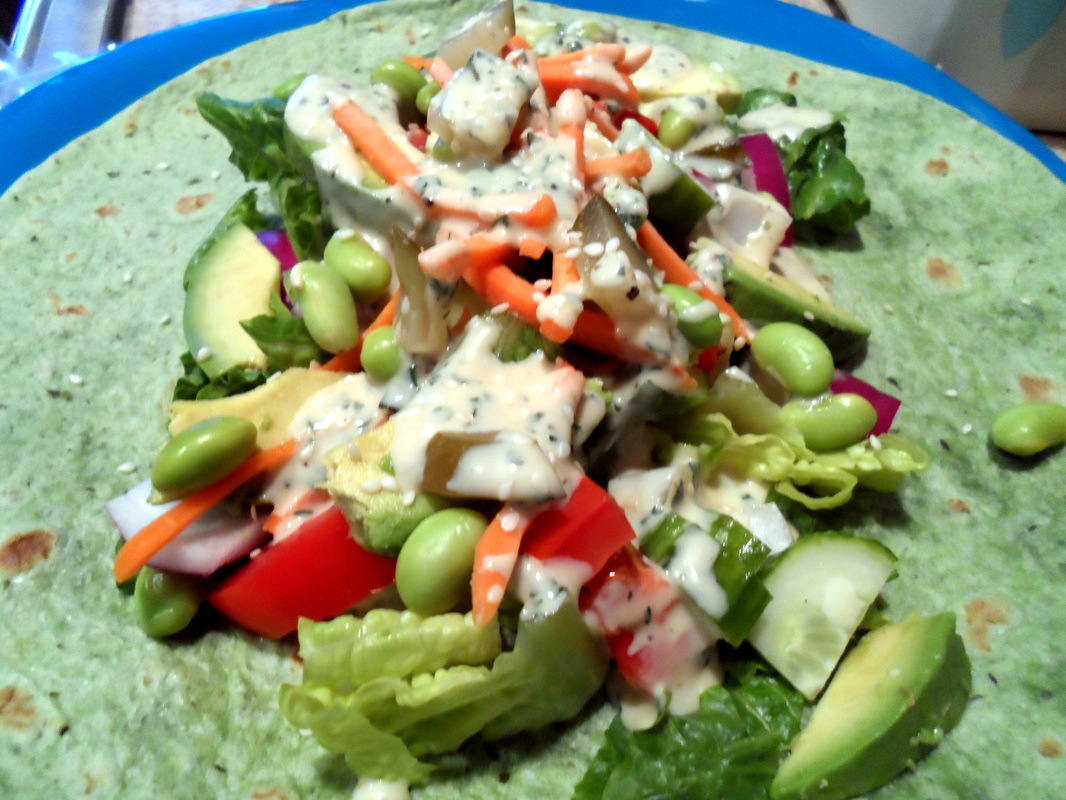
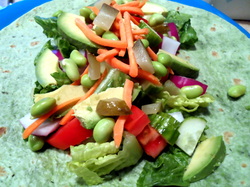 If you're looking for a quick and easy lunch or lighter dinner that's loaded with veggies, high in protein, and packed full of flavor then this recipe is for you! This wrap could easily be served up with some soup or perhaps a side of hummus and fresh-cut veggies! Either way you serve it, this wrap is great! This recipe makes 2 servings.
Ingredients: Sauce:
3 tbs. Veganaise
1 tbs. Dijon mustard
1 tbs. Maple syrup
1/2 tsp. freshly ground pepper
1 tbs. fresh parsley, minced *optional
1 tsp. fresh thyme, minced *optional
(If you have the fresh herbs listed above that's great but if you don't this sauce still tastes awesome! I chose to use the herbs because I had them in my garden.)
For The Wraps:
2 tortilla wraps (I chose spinach)
2 cups romaine lettuce, chopped
1/2 of a plum tomato, diced
1/3 cup red onion, chopped
1/2 cup cucumber, chopped (I did 1/4" thick slices and then quartered them)
1/2 of an avocado, sliced
1/2 cup shelled edamame, cooked (See Note at Bottom)
1 dill pickle, diced *optional
1/3 cup matchstick carrots
2 tsp. sesame seeds How TO: In a small bowl, combine all of the ingredients for the sauce and whisk by hand until completely blended.
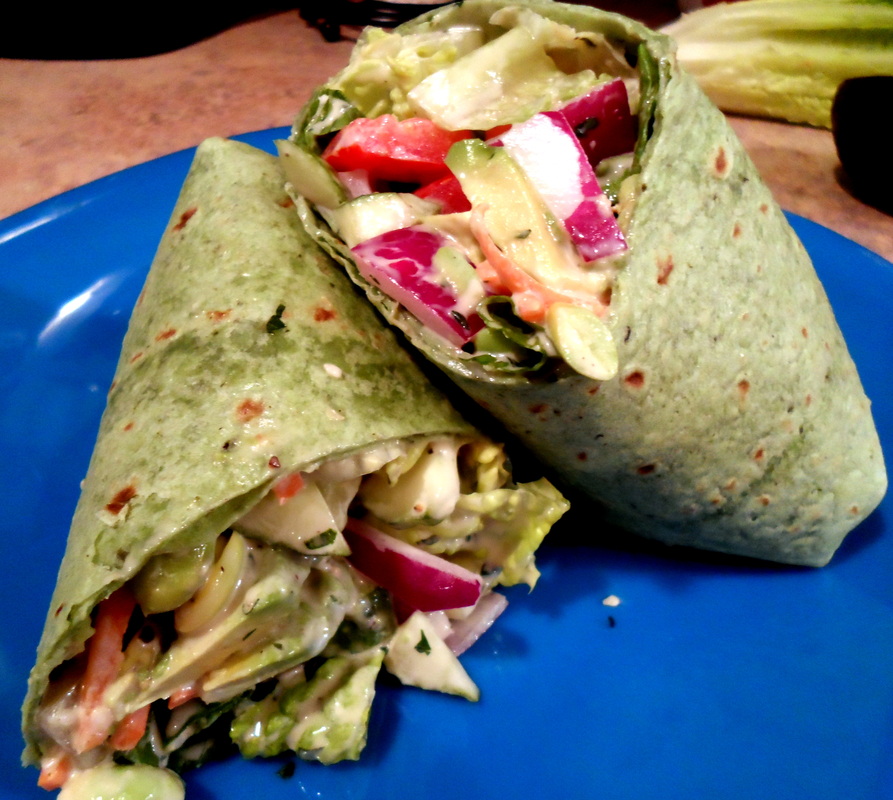
Place the wrap on a flat surface and add half of all of the veggies to each wrap in the order listed above making sure to place the veggies more towards one side of the wrap.
Drizzle the veggies with the Maple Dijon Sauce and sprinkle each wrap with 1 tsp. sesame seeds. Tuck in the ends of the wrap and tightly fold over the veggie filled part of the wrap, give it a gentle tug to tighten the roll, and then roll to the end of the wrap. It's important to wrap it as tightly as you can so that it doesn't fall apart when you eat it! You can cut it in half if you'd like. Yummy! Enjoy!
* I had some frozen shelled edamame in my freezer. I just threw some in a pot, covered it with water, brought it to a boil (uncovered), and boiled it for 3 minutes. Then I strained it, rinsed it with cold water, and drained well.
 Awhile back I reviewed this 'Vegeterian Jap Chae' recipe from Alice which was a guest submission recipe on the Herbavoracious blog. My husband and I absolutely loved this dish but there was one problem...it was SO greasy! Lately, I've been discovering about how most oils are actually not good for you; even extra virgin olive oil! If you're looking for more information on this then I suggest to watch the film "Forks Over Knives: The Extended Interviews".
So I decided to revisit this recipe in search of a way to make this healthier than the original version and it was a success! I actually think the healthier version was more flavorful! This is what I did differently:
I used veggie broth to sauté the vegetables.
I sautéed the onions and bell peppers together with a little bit of veggie broth. I placed the lid on the pan until the onions were translucent and the peppers were tender. I then removed the lid and let most of the moisture evaporate. I added a pinch of salt to this mixture and some freshly ground pepper. I used 1/4 tsp. of the sesame oil for this entire combination.
I then sautéed the carrots in the same manner. I did NOT add salt for the carrots but I did add pepper. I did not use sesame oil for the carrots.
Next, I sautéed the mushrooms in veggie broth. I covered the mushrooms until they were tender. I removed the lid and then added a pinch of salt and freshly ground pepper to the mushrooms and let most of the excess moisture cook out. I used 1/4 tsp. of sesame oil for the mushrooms.
I did use olive oil to fry the tofu in but I after I was done frying the tofu I used the excess oil and moisture to cook the green onions and garlic. I did NOT add salt or pepper to either the tofu or green onions. I did NOT use sesame oil for the tofu or green onions.
I did use olive oil when adding the noodles but I only used 1 tsp. instead of 1 tablespoon.
In my review you will notice that I added rice vinegar. I also added rice vinegar to this dish as well but I ended up pouring more than I anticipated! It was the perfect amount of rice vinegar though! I would estimate about 3 tablespoons of rice vinegar.
I didn't have to add in any extra soy sauce like last time. I did use low-sodium soy sauce with this dish as well.
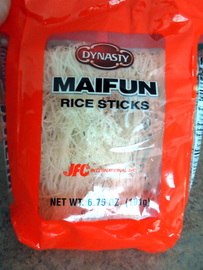
I also used the same alternative noodles that I chose last time...the rice stick noodles.
Just by making these simple changes I was able to omit 5 & 1/2 teaspoons of olive oil, and 2 & 1/2 teaspoons of sesame oil! I probably used no more than 1/4 cup of veggie broth total, if even that much. You just need to be more aware of the veggies when you're sautéing them because they have a tendency to stick a bit more. If the veggies start sticking you can add more broth. I also used low sodium soy sauce and I didn't salt the veggies as much as directed. This dish still turned out amazing and I think it was more flavorful than the first!
If you're interested in making this dish you can find the original recipe here and if you'd like to make a healthier version you can just follow the simple alterations that I listed above. Please check out my review for more helpful tips here.
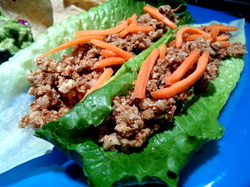 * * * * *
Oh. My. Goodness. These tacos were awesome and they really hit the spot! I rate this recipe with 5 huge stars! I couldn't put these tacos down! I found this recipe on Pinterest and it's from Christy at The Blissful Chef blog. My Husband really enjoyed these tacos as well! He seemed a bit skeptical when I pulled out the romaine lettuce leaves to use for the taco shells but as soon as he took a bite all of the skepticism disappeared! These tacos literally took only 10 minutes to make besides the time used to soak the nuts! They satisfied my craving and went above and beyond my expectations. I only used shredded carrots and salsa to top off my tacos and I served it with a side of my homemade guacamole.
What I Did Differently: I didn't change one thing about this recipe! Overall Thoughts: This recipe will definitely be one of my "go to" taco recipes! I will be making these again...probably very soon! I can't wait to try more recipes from Christy! She is brilliant!
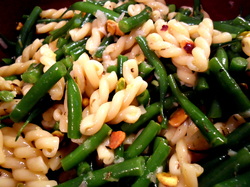 This recipe is bound to knock you off of your feet because it's packed full of flavor! This recipe is perfect for those hot summer days or when you're itching for Spring or Summer to come! I adapted the original recipe from Myrecipes.com to make it vegan and I changed up a few things. I used to make this recipe when I was not a vegan and I could never get enough of it! So, when I went vegan I was determined to enjoy this dish and stick to my vegan diet without missing the flavors of the old recipe and it was a success! I hope you enjoy!
Ingredients: 8 ounces gemelli pasta
1 & 1/2 cup haricot verts, sliced into thirds (French beans; if you can't find them then you can substitute regular green beans)
2 tbs. fresh thyme, minced
Grated rind of one lemon (about 2 tbs.)
1 medium shallot, minced
2 tbs. champagne vinegar
2 garlic cloves, minced
5 tbs. olive oil
1/2 tsp. kosher salt
1/2 tsp. black pepper, freshly ground
1/2 cup shelled pistachios
1/2 tbs. nutritional yeast How To: Bring a medium pot of water to a boil. While you're waiting for the water to boil whisk together the thyme, shallots, champagne vinegar, garlic, olive oil, salt, and pepper in a large bowl. Set the sauce aside.
Add the pasta to the boiling water and cook per package instructions and add the haricot verts during the last 3 minutes of cooking (if you're using the regular green beans then add during the last 4 minutes of cooking). Strain the pasta and green beans and rinse with cold water until completely cool and drain well.
Whisk the sauce once more and add the pasta and beans to the bowl. Add the pistachios and sprinkle the nutritional yeast on top and toss well to coat evenly. Place pasta in a serving bowl and serve with additional nutritional yeast to sprinkle on top if desired.
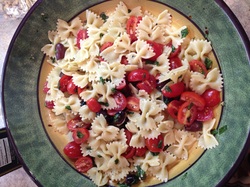 * * * * *
Wow! This dish was just absolutely amazing! I found this recipe on Pinterest and it's from MyRecipes.com. I was really surprised with the amount of flavor in this dish and both my Husband and I polished it off! This dish was so easy to make and it was great for the hot summer night that we were having! All of the flavors in this dish were complimentary and a perfect combination! This dish is bound to ''Wow" you!
What I Did Differently: I used kalamata olives because I couldn't find the kind listed in the recipe.
I let all of the ingredients EXCEPT for the pasta marinate for awhile. My husband and I were doing some yard work and I figured that if I prepared everything but the pasta and let it marinate while we worked in the yard for about an hour that it wouldn't hurt! It turned out AMAZING! Overall Thoughts: This is a recipe that I will HAVE to make again. Actually, my husband asked if I could make it again tonight! So, that's how good it is! If you have the time I would let the ingredients marinate at room temperature for at least a half hour.
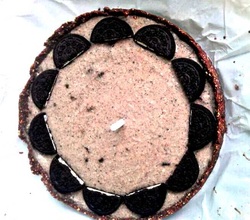 * * * * *
Oh my, oh my, what an awesome pie! This gets 5 big stars! I found this recipe on the Chocolate Covered Katie Blog. I made this pie for my husband's birthday yesterday (please don't mind the birthday candle in the picture) and it was a huge hit that it even fooled my non-vegan parents! This pie is just plain good and the real catch is that it's actually a healthy dessert! Katie is my new savior for helping me to cure my sweet tooth but staying on track to eating healthy! Thank goodness for people like her! If you haven't heard of her blog then I advice you that you must check it out and give her recipes a try if you love your sweets but don't want extra weight in your caboose! Anyways, the filling of this pie is made out of a surprising ingredient...cashews! The freaky thing is that you can't even tell! She does list other nut options in her recipe but seeing as how I had raw cashews on hand I just used what I had. If you're looking for a crowd pleasing pie that's bound to fool even non-vegans and cure your sweet tooth then this is the pie for you!
What I did Differently: I just embellished the top of the pie with Oreo cookie halves to jazz it up a bit.
Katie offers different options to sweeten the pie with and I chose maple syrup. Overall Thoughts: I will be making this pie again! It was so easy and simple to make and it used regular ingredients that I typically have in my pantry! Everyone LOVED this pie! It was a great birthday treat for my husband!
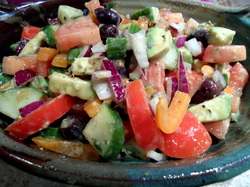 I don't know about you but I LOVE Greek salads! This recipe uses fresh ingredients without any fake "cheeses", it's ready in about 15 minutes, and the ingredients are simple! This is a simple recipe that is perfect for picnics, summer cookouts, a great summer side dish, and it can stand as a meal on its own on those hot summer nights (it's great when served with some nice crusty vegan bread)! I adapted this recipe from my Dad who is notorious for making some of the best Greek salads! Although, my Dad makes his Greek salad with feta cheese I have found that avocado is an even trade for no cheese to make it vegan! I have great memories of sitting out on the deck on hot summer nights and eating a refreshing Greek salad while sipping on some wine with my parents. I hope you can create some great memories with this salad too!
Ingredients: 2 Roma (plum) tomatoes, sliced into 1/4" slices then quartered
1/2 of an English (seedless) cucumber, sliced into 1/4" slices then quartered
1/2 of a bell pepper, roughly chopped; red, orange or yellow peppers work best
1/4-1/2 cup red onion, chopped (amount to your preference)
1/2 avocado, diced
1/4 cup pitted kalamata olives
1/2 lemon, juiced
1/4 cup olive oil
1 tbs. fresh thyme, minced
1 tbs. dried oregano
Salt & fresh cracked pepper to taste (I used about 1/2 tsp. of salt and 1/4 tsp. of cracked pepper) How To: Place the tomatoes, cucumber, bell pepper, red onion, avocado, and kalamata olives in a large bowl. Pour lemon juice and olive oil on top. Add the thyme, oregano, salt and pepper and toss to evenly coat. You can add more lemon juice if you like your salad a bit more sour or you can add more olive oil if you like it less sour. Place everything in a serving dish and it's ready to enjoy!
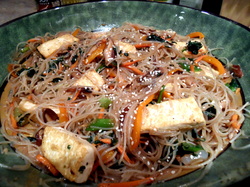 * * * * *
This recipe gets 5 big whopping stars from both me and my husband! I found this recipe on Pinterest. This recipe is a guest submission by Alice from the Savory Sweet Life blog which was featured on the Herbavoracious blog. This dish was easy to make, completely satisfying, tasted great, and it really hit the spot for a fulfilling meal! It's also vegan so I didn't have to substitute any of the ingredients!
What I Did Differently: I couldn't find the potato starch cellophane noodles but I didn't look farther than Pick N' Save because I'm still on my crutches and getting around isn't quite as easy. I used rice stick noodles because they were the closest choice that resembled what was pictured. These noodles worked perfectly so if you can't find the other kind you can use these as an alternative. The noodles came in 3 bunches and I used 2. I followed the package instructions and I covered the noodles with hot water and let it sit for 10 minutes. They were perfect! I believe I ended up with a little more noodles than the recipe called for but I figured that one bunch would be too little. However, I would still do two bunches and up the amount of some of the veggies because this dish will go fast!
I used low-sodium soy sauce.
I added a bit more spinach because I love my greens!
I used a package of pre-sliced shiitake mushrooms because it was all that the grocery store had. It was probably double the amount but we love our mushrooms!
I used an orange bell pepper because the red bell peppers didn't look as fresh as the orange bell peppers at the grocery store.
I taste-tested the finished product before serving it and I decided to sprinkle a little bit of rice vinegar on top and tossed it in so it was evenly distributed. I did this because I didn't want it quite as sweet as it was and I figured that the rice vinegar would compliment the flavors. I also chose rice vinegar because it's a very mellow vinegar. It turned out perfect!
I also added a little more soy sauce. I believe I had to do this because I had a bit more noodles than what the recipe called for. I probably added about 1-2 more tablespoons.
I served this dish with some spicy Sriracha sauce and it really brought the flavors of this dish!
Overall Thoughts: I will definitely be making this recipe again! If using the alternative noodles I would double the tofu, spinach, pepper, mushrooms, green onions and carrots. If you use the noodles that the recipe calls for then I would use the whole block of tofu because both my husband and I thought it could use more. If you don't like yours quite as sweet then sprinkle with some rice vinegar or decrease the amount of sugar. I think a great addition would be to add in some red pepper flakes to liven up the dish a bit. I think the Sriracha sauce is a definite must have when serving this dish just because it tastes AMAZING with it! I would like to experiment on cutting down the amount of oil used in this recipe to make it a bit healthier. I think this could be done by sautéing some of the veggies together or by using veggie broth or water for sautéing instead of the oil. This dish is DELICIOUS and a MUST try! Update: Click here for a healthier version without a lack of flavor!
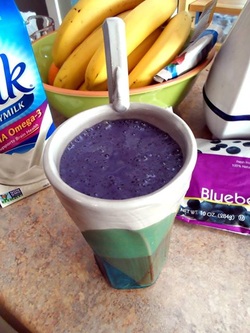 * * * * *
This recipe gets 5 big stars from me! This was so tasty that I can't seem to get enough of it and now breakfast smoothies are my new
addiction! I found this recipe on Pinterest from Sarah at A Rented Kitchen blog.
What I did Differently: I used soy milk and I used 1 cup instead of 2/3 cups. I also used a fresh banana because I didn't have any frozen. Overall Thoughts: I will definitely be making this again and using this as a basis for my smoothies! Yum!!!!
|

 RSS Feed